What else happened in 1966?

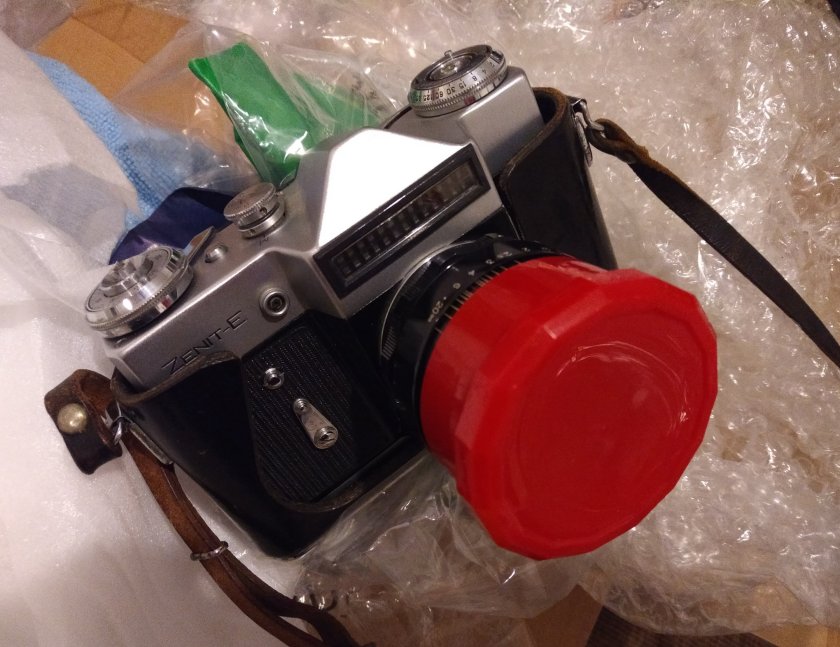
A while back, maybe last year, I was given a Zenit E. It came with the usual Helios 44 lens that every groovy bokeh-beast wants for their digital. So I did what anyone would: I flipped the elements. It’s supposed to give a petzval effect with swirly backgrounds. It kind of worked, but mostly it was just very blurry. So I flipped the elements back the right way round and tried it for the usual bokeh shots. It’s OK, but I prefer my Industar 50-2. So what was I to do?

I loaded it with film. Not just any film either, but a roll of Retropan 320 Soft. Why change just one variable when you can change several, so you have no idea what is going on?

I also did a bit of research on the camera. Turns out it was a special model for the export market for one year only. The bonus feature for that magic year of 1966 was that the shutter speed dial had a chromed top rather than black paint. Be still, my trembling heart!

So what does a kilo of Soviet pride have to offer? This is the E model, that has a built-in but uncoupled light meter. The first thing is that the meter serious over-reads. Perhaps this is why it is in such good condition: anyone believing in the meter would be underexposing by at least five stops so would have rapidly lost the love of using this camera. Later models have an adjustment screw that means you can probably reset the meter, but the E does not.

And then there is the lens. This is a block of metal and glass you could kill zombies with, and it has a pre-set aperture. That means you set the aperture of choice on the ring furthest from the camera body, and then stop the lens down to that pre-set by twisting another ring just before taking the picture. In the days before automation this meant you could focus the camera with the lens wide open, giving you the brightest view and most accurate point of focus. Then a simple twist of the wrist dropped the lens to your chosen taking aperture just before you pressed the release. It needs discipline: I’m so used to cameras that stop the lens down themselves through a pin or lever that I forget to twist the magic ring. Result – overexposure. Perhaps between the camera meter underexposing and the lens overexposing there would have been an occasional happy accident? I expect though that this beastie rapidly fell out of favour unless it was used by a real enthusiast.

So here it is, in excellent cosmetic condition – one careful owner, you could say. Then it met me.

Well, how does she handle? To use a motorcycling comparison, like a pissed pig on a tea trolley. You have to wind-on before changing shutter speeds, because you need the dial to line-up with its reference mark. The fancy chrome top to the shutter speed dial makes the reference mark very hard to see. You have to lift and twist the dial to change speeds, so you find yourself slowly twisting the dial to find the point where it lines-up and drops back down. So in use, you tend to set the speed and leave it.

The focusing screen is dark and not very positive. I have other cameras that have a real snap to the focus – you can see easily when something is sharp or not. With this beasty I was racking the focus back and forth and trying to judge where it was sharpest. I even tried adding some diopter adjustment to the eyepiece to see if it made the screen sharper (it did not). The result was that I used an SLR as a zone-focus camera. I know the Leica-likers do this because of the shortcomings of a rangefinder (ok class, discuss), but this is an SLR dammit! So I set the aperture and closed it down, set the shutter speed and dialled the lens to either the hyperfocal distance or the range I wanted sharp. In effect I turned an SLR into a point and shoot. Nothing wrong with that, except it weighs a kilo. And I had to carry a light meter as well. The last point is not really bad, because I could use an exposure calculator which weighs less and takes up less space than the lens cap.

So why bother? Well, if you really do want your photography to slow you down, this is the boy for you. Anything other than controlled method will yield bad results. The cameras are also cheap and tough. If what you want is a working shutter that will take any M42 lens, then this is also the boy for you. You will just need to make sure that your lens has an auto/manual switch for the aperture or is a pre-set, as this Zenith lacks the pusher that presses the aperture pin (or you use a bit of card and some gaffer tape to hold the pin down. Don’t do this at home, kids). On the other hand, this camera was built to the same premise as a Russian tank: what it doesn’t have can’t break. This 1966 camera is still working long after the plastic and electronic wonders of the 70s, 80s and even 90s have died.

Should you buy one? Yes, if you can get one cheap with a lens on it. But if you can’t live with the limitations, look for a screw-mount Praktica instead. Or start a love affair and buy an old Pentax.

A thing of beauty is a joy for a fortnight

My mum gave me a carrier bag full of old negatives. These were an unknown collection of formats ranging from neat sets still in their Boot’s envelopes to individual bits of film. And the great thing is that they are all still usable. Scratches aside, I can get an image off all of them.

Imagine if my mum had given me the family collection of floppy disks, or Zip drives, or even VHS tapes. The quality would be undimmed (mostly) but could be beyond retrieval. Give it a few more years and both CDs and DVDs will have lost the means to read them. I work in IT and I’m old enough to remember people using 8″ floppy disks. That’s within my working lifetime. Some of the negatives my mum gave me predate me as a person. If you want another example, look at the BBC Domesday project from 1986. Perfectly preserved and, for most people, irretrievable.

As a result, the best long-term storage for text is still paper or film. Good paper can last a century and microfiche is good for around three. If you want to preserve pictures, then the best methods would be to store negatives or prints. How ironic. Amongst the family pictures were some prints. One was of my great-grandfather, in uniform and posing with great granny. A quick zap on a scanner and we found his regiment using the shape of his badge. We didn’t need the scanner, it was just more convenient to put the image up on the screen to do side-by-side comparisons.

So what’s the outcome? Print your pictures. Give copies away so there is more than one. File your negatives (rather than sandpaper them, as some of mine appear to be). Then your pictures stand a chance of being a source of joy and wonder to your descendants rather than marketing opportunities for TwitFace.

Rufty-tufty film camera review

Sand. Seawater. Dirt. Rough handling. Foul language. OK, maybe not the last one. Although the full set does sound like a good weekend.

Maybe these are the things you want your camera to handle. I’ve shot stuff in the past that meant I had to put the camera in the airing cupboard for a week to dry it out. Rain is one thing, but wind-blown sand is a horror. This stuff leaves you with scratchy focusing or crunchy cameras. You need something that laughs in the face of danger.

Lots of modern digital cameras have weather sealing, and you can buy compact cameras that are sealed and waterproof to five meters or so. But this is a review of the cheap-ass end of the market, based on stuff I own and use. The stuff that I don’t have to take special care of or dry out after use.

First up, the Sea and Sea MX-10. This is a very basic yellow plastic housebrick with a dedicated flashgun. Basic, because the lens is fixed focus and the shutter fires at 1/100. You have the joy of controlling the aperture and there is a rudimentary built-in meter that works for 100 or 400 ISO.

It’s a child’s toy amongst cameras – big, simple, strong. I printed and laminated the table of focus ranges for each aperture and then just get close enough to put the subject in the sharp zone. On land the lens is focused at 2.5m so you use the aperture to control the depth of field around it.

The only real drawback is the cheap two-blade aperture that forms a square hole, so turns your bokeh into cubes. It’s big, tough, very simple to use and (if you shop carefully) cheap as chips. A nice feature is that the lens front has a standard bayonet fitting common to Sea and Sea that lets you use their supplementary wide-angle lenses. You need these underwater as the refraction reduces the angle of view of the 32mm lens to nearer 45-50mm. On land it lets you get more in or keep bigger subjects in the sharp zone of the lens.

For a camera this crude and simple it actually works quite well. Plus you can drop it in the sand or the sea, take it swimming or go out in a British summer. Just don’t pay a lot for one – this is not a sophisticated camera.

MX10

Prior to this I had its big brother, the Motormarine II EX. This has a focusing lens controlled by a dial on the front of the body, that also includes a close-up setting. The EX model also includes a choice of shutter speeds, but they only run from 1/125 to 1/15. Frankly, I found it a bit of a handful. While you can scale-focus the lens you have no indication of the depth of field (unlike the Nikonos, of which more later). The camera uses DX coding but only recognises 50, 100 and 400 ISO film. Granted, it works, but the aperture and focus dials are hard to read underwater, particularly if you are of a certain age and need reading specs. Above water it falls into the gap between Lomo and hi-fi – it has some controls so you need to fiddle with it but not enough to make it worth the effort. I got some good pictures with it and learned a lot, but sold it on with no regrets.
Tech specs
35mm f3.5 lens. My copy of the manual says 34 elements in 3 groups, but you’d only get that if you dropped it. I reckon they meant 4 elements in 3 groups, making it a Tessar.
Focusing down to 0.5m.
Built in flash with GN10 at 100ISO.
DX coding for 50, 100 and 400ISO.

For a while after the EX I had a Minolta Weathermatic 35DL. I thought this was going to be the answer. It had autofocus and a dual-lens setup that gave you 35mm or 50mm. It was waterproof to 5m. But the focusing broke, even though the camera kept working. I only found out after shooting a whole roll of impressionistic fuzz. Late 80s electronics to blame, I expect. Verdit? Fragile.

Charlie chased

Next up is a Japanese oddity – the Konica Genba Kantoku 28WB. I admit to buying one of these when I read a review on 35mmc. This was the replacement for the Minolta, and it seems to be working better. It’s basically splash and dirt-proof rather than waterproof. The sharp wide-angle lens was meant for recording building projects. It’s chunky and has just enough controls to be useful – you can force the flash on or off and use a macro mode. If you keep the sun off the glass cover in front of the lens it takes a good snap. You also have the joy of a camera that can be thrown in a bag, used in the rain or dragged through as much dirt as you can eat. It also looks rather funky, like an overgrown point and shoot. This gets used a lot on beaches and it works well.

Genba
Tech specs
28mm F3.5 lens of 8 elements in 7 groups. Minimum focusing distance of 0.5 meter. Shutter speed range from 1/4 to 1/280 second. Metering by a CdS sensor with a range of 5.5 to 16.5 EV (ISO 100). The built-in flash has a range up to 5m at ISO 100 and 10m with ISO 400 film. Film loading and advance are automatic with a motor drive. Film speed set by DX coding.

At the top end of the range comes the Nikonos. There are two basic types – the ones up to type 3 that were manual and came apart for loading and the later types 4, 4a and 5 that had a conventional opening back. You can spend a lot of money on these if you go for one with a flashgun or wide-angle lens. Be aware though that lenses wider than the standard 35mm will usually only work underwater. For surface to damp places stick with the 35mm. There is an 80mm lens for it, but this is a scale-focusing camera so unless you also carry a rangefinder about with you, stick with the 35mm. So if you want one, go for the 35mm lens, no flash or extras and in orange rather than the optional green.

Mine is a type 5 and what you get is a heavy and robust camera with autoexposure, shutter speeds up to 1/1000 and a very nice 35mm lens. The focusing is by guesswork, but the lens does have a lovely pair of markers that show the depth of field for each aperture. It couldn’t be simpler to set an aperture, set the point of focus to give you a useful range and let the camera handle the exposure (unless you confuse the metric and imperial distance scales).
The viewfinder has a high eye relief as it is meant to work with a diving mask. The frame lines are well within the visible area, so it’s easy to see things coming into frame. Given that you keep the seals clean this camera will survive just about anything. They were used by photographers in Vietnam, which is where I understand the desire for an 80mm lens came from. Probably the low-vis green paint option too.

This is the expensive and heavy end of the range of tough film cameras. It can be cheap though, especially if you look for mis-spellings and partial names.

So, what do I recommend? If I’m going where I need a water and dirt resistant camera my first choice is the Konica. It’s not heavy (it’s my brother), it’s easy to use quickly and the lens is sharp.

Next would be the Nikonos. Great lens and more control over the camera. No flash though. Well, not a sensible flash that you could carry about with you.

If there was a risk of destroying the camera or things could get hectic, it would be the MX-10. With the flash attached and the aperture set there is nothing to fiddle with. Get the subject in the sharp zone and go. And if they attack, you can fend them off with it. An anti-zombie camera.

Or forget all this nonsense and buy a nice ruggedised digital point and shoot.

Are you sitting comfortably?

If you recognise that phrase you could be as old as me, although the programme ran until 1982 so you might equally be a spring chicken.

What’s the story? Or, to poke another meme, “I’ll tell you a story, about Jack a Nory…”.

We, as a species, love story-telling. I believe this because Yuval Noah Harari says so and so do Mssrs Stuart and Cohen in The Science of Discworld II. Their argument is that it was the cohesive power of a shared story that taught us to collaborate across family and tribal borders. It also led to religion, but that’s another story.

So what the Darwin has this got to do with photography? Narrative has power and people look for a story. Even in the absence of an available story, people will make one.

The desire for a compelling tale is so strong that we will choose the embellished story over the plain and more likely one. See Kahnemann and Tversky’s Linda experiment for further details.

The expression of this in photography is when people tell you what they see in an image. I’ve heard photographers talking about people telling them what their picture is about, in terms and directions that were a great surprise to the person who actually made the image.

Fish on grass

So why should you care? Well, your pictures will tell a story whether you like it or not. If you have a particular story in mind, you should either make it very clear or add words. If you do not, the viewer will make their own story, and it may not be the one you intended. If you care, you need to make your story more clear. But if you think of how many times you see an image without a caption or description though,you might believe that the story should be in the image.

You might also think that what matters is not the story you are telling, but that there is potential in the picture for people to make-up their own story. Obviously this doesn’t apply to news photographers, social documentary and so on – these people really do have a story to tell and will work hard to do it. For me though, I can try to add elements to my picture that will lead the viewer to make a story. So I can try to show a relationship, or show someone’s doing something interesting that will make the viewer ask themselves what is going on.

Waiting for the man...

Perhaps this is the second Golden Question – the first was ‘what do I see?’. This one is ‘what does it say?’.

Does every picture have to tell a story? No. But that leads to the third Golden Question of ‘why should I care?’ Which is the realm of landscape photography.

Drop in the ocean

We’ve all seen Blue Planet, but what could you realistically get with amateur kit in unexotic places?

First – amateur kit. Going any deeper into water than being splashed requires an underwater housing. If you thought cameras were expensive, look at housings. They are specific to the make and model of the camera, so any thought of changing your camera becomes at least twice the investment. I regularly dive with someone who uses a video camera, and the housing alone cost more than both of my family cars.

But, there are plenty of people who give-up the sport and sell their kit, or who do upgrade to something better. So the usual online markets are your friend, if you are happy to use a modest camera. There is also the ever-present risk of a leak, so I am happier risking £40 than £400 or even £4,000. I’ve got a second-hand Canon Digital Ixus 750 which was originally advertised as “With its sleek Perpetual Curve design, the contoured all-metal body of the Digital IXUS 750 represents the pinnacle of Canon design excellence”. Does make you wonder why Canon didn’t stop right there and not build another camera. It has a 7mpixel sensor, which is adequate. It also has a built-in colour correction mode for underwater, of which more anon. This, with housing, cost about £20.

Next – unexotic places. I regularly dive in a flooded quarry and off the cost of East Scotland. The quarry plays host to large groups of training divers, so the bottom gets very stirred-up (the quarry’s, although I’m sure some of them also feel the tingle). Visibility in the quarry can be less than two metres. There may be less silt in the water in Scotland but it also gets darker at depth.

The answer is to get close. The less water there is between the camera and the subject, the less silt and haze. So most underwater photography is done through wideangle lenses or as macro. The little Canon camera has a half-decent macro mode enabled through one button on the back.

The other problem is dark. Water absorbs a lot of light, and not all the colours are absorbed at the same rate. This is why the Canon has an underwater setting – to boost the red part of the spectrum and make up for the losses. For snorkelling depths this works pretty well. Any deep than a couple of metres though, and you need flash.

The little Canon point-and-shoot has one of them too. Right next to the lens. This is the ideal position for illuminating the silt in the water. Get in very close in macro mode and it works reasonably well. Try to take a picture of a person and you get the ‘diver in snowstorm’ look.

peasoup.jpg

So you get as close as you can.

Sea urchin, Eyemouth 15 June 2019

I found a second-hand underwater flashgun on that usual online market. This one was ideal, as it had a built-in slave cell. This means it can be triggered by the weedy built-in flash, or even used as a second fill-light. It’s a reasonably handy rig – small enough to hold out one-handed at arm’s length to get close to a fish without scaring it with your body bulk.

Sturgeon, Capernwray
Sturgeon
Perch, Capernwray
Perch

And sometimes you get lucky and find the entire seabed covered in a carpet of starfish.

Brittle stars, Eyemouth, 16 June 2019

So, surprisingly, you can use modest kit to take reasonable pictures. The limitations are that you probably can’t enlarge much from a small sensor, but the muck and refraction can make that a challenge even for big cameras. Lighting can be a problem, as can getting close and using very wide angle lenses.

It will never be a challenge to the BBC, but it will do for me.

UPDATE

A lobster eating a jellyfish. Never seen this before. Taken on cheap kit.

Design a site like this with WordPress.com
Get started