Stand and deliver

A few years back I had the job of arranging the speakers for a photography club. There was a regular repeating group of local pundits, so of course I went totally off piste and got people in who did more than the usual landscape and a bit of wildlife. One of these was the (sadly missed) Terry Cryer. Apart from being a wonderful raconteur and a brilliant printer, he was also a great photographer. One of his pictures was a little girl stood in a doorway. He said it was almost too dark to focus, so he threw the film in some D76 diluted 1:100 and left it for a couple of hours. My spider senses were aroused – what was this thing he did? It was stand development, and I was at least a hundred years late to the party. So I parked the idea in memory as something that might come in useful one day.

Day – and I had a roll of film shot under difficult lighting. Very contrasty, with intense highlights and deep shadows. What I needed was a method of holding back the development of the highlights while bringing-up the shadows. There was something rattling in the back of my head about standing around. To t’interweb!

It seemed the answer was semi-stand development in dilute Rodinal. Even more joyous was the message that the same development method and time worked for most films, so I could fill the tank with different types or speeds and get loads of stuff done in one go. So, here we go – Rodinal diluted 1+100; normal agitation for the first minute then leave the tank to stand; one careful inversion every 30 mins; tip it out, wash and fix after two hours. And it worked!

Even better was the news that it could be used on old film or film with unknown sensitivity or exposure. I got a very expired roll of Tri-X as part of the Emulsive Secret Santa with the first couple of frames shot by the donor and me to finish. It worked better than I hoped, even though the film itself was fogged and spotty ( which reminds me of my teenage self).

I had previously tried two-part developer as the magic combination. This too is supposed to preserve the highlights while developing the shadows. The problem is that I seldom got it to work. Unless I made it fresh, my film was grossly under-developed. But the joy of stand development is that the developer is freshly made, just that there is not much of it in the water.

It seems to work though, and it works with pushed film. There are some films that are recommended to not develop with this method, such as Fomapan 320 soft, but my regular diet of HP5 works well. Do I use it all the time? No, I don’t want to take more than two hours to develop a film. I am also worried that I could end up with streaks, so normal film gets normal methods. It’s a useful tool in the box though for when you could have underexposure or a wide exposure range on the film. And isn’t that how you used to tell a Real Engineer – that they had a graded set of hammers?

What about two-part development though? Doesn’t that do the same thing, with less risk of streaking? I would use them to do different jobs. Two-part development works by soaking the film in developer, and then activating just the developer that was absorbed in the film. I would use two-part development when I had greatly overexposed the film. It holds back the highlights because they only have as much developer as they absorbed. So this should be great for pulling film: giving it two or three stops of overexposure so that you get loads of shadow detail. I actually did this as an experiment, photographing a willow tree in full leaf in direct sunlight. Each frame in the sequence was overexposed by an additional stop, but all that happened is the shadow detail increased: the highlights stayed the same. So this is great for when you have to deal with high contrast and want to render it ‘normal’.
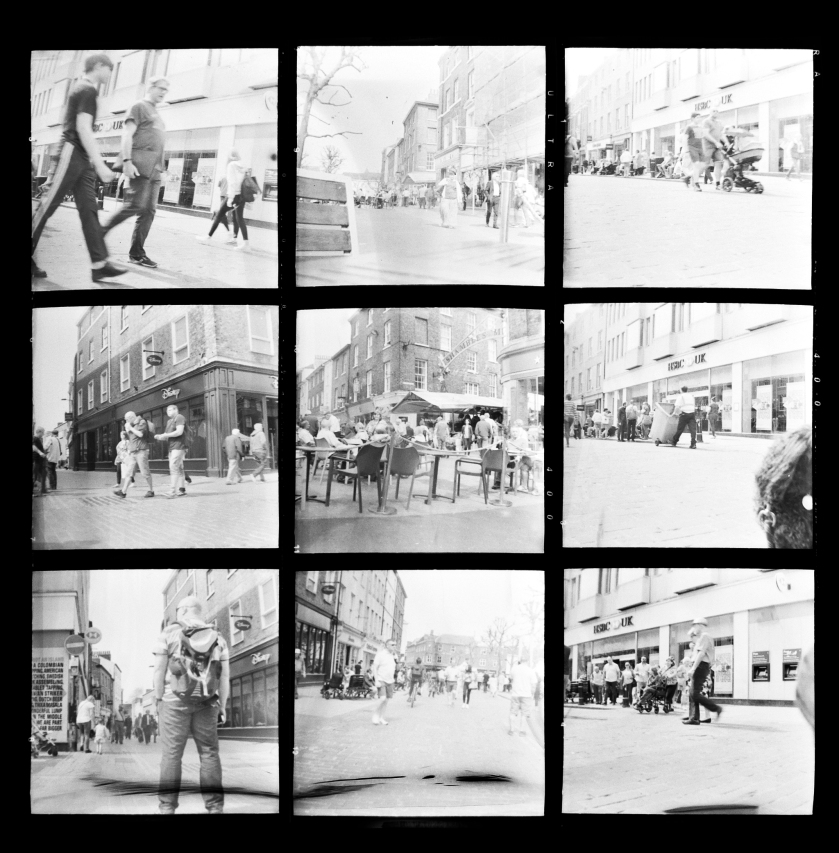
People of York
Shot on a Kodak Brownie Hawkeye on ISO 400 film in bright sunshine. Coped nicely with overexposure.

I would use semi-stand development for when I had pushed the film. The highlights are held back because they exhaust the developer locally, while the shadows continue to develop. What Terry Cryer did was to push his film with the picture of the little girl: underexpose and then bring it up in development without increasing the contrast too far to be printable. I would also use semi-stand for when I had very mixed scenes on the same film. An example was recently, where I was using an unsophisticated camera to take both night shots and daytime landscapes. Bung the film in the tank and semi-stand it and all the frames turn out OK.

No doubt people use either method to do either job, and I think even my description of them ends up saying that they are the same. For me it’s all just theory anyway: I’ve found two-part developers to be unreliable, while semi-stand uses known good chemicals. So while I might theorise about using different methods, I would use semi-stand for both situations.

And an aside – why semi-stand and not stand? Stand means no agitation at all, and really does risk getting streaky negatives. Semi-stand means agitating a tiny amount; just enough to stop the streaks. And not a double-entendre in sight.

Is it worth trying? For sure, so that you have it there if you ever need it. Give it a go. I’m adamant. (Sorry!)

Making pictures pop

A quickie, as it’s Boxing Day.

If you could do one thing in Photoshop to make your pictures look better, this is it.

Try doing this before you do any other edits. If you are worried about the effect, make a copy of the image layer and apply the effect to that. But I believe this works so well that I would apply it to every picture, whether I then make any further edits or not.

“So what is this magic?” I hear you ask. It’s using an unsharp mask to make the picture pop.

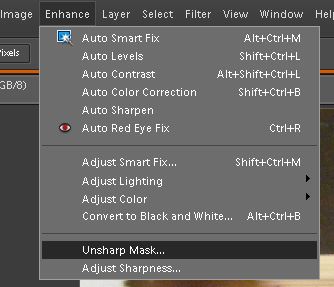
There will be a similar menu sequence in other good image editing programs, but in Photoshop (Elements, in my case), it’s Enhance, Unsharp Mask.

Mask 1

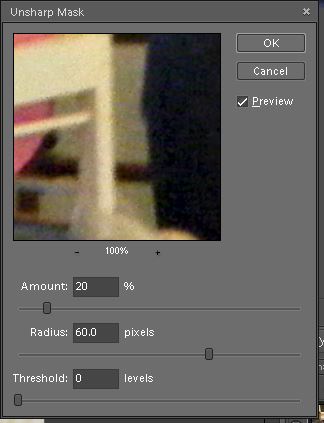
Make the settings Amount 20%, Radius 60, Threshold 0.

Mask 2

Photoshop has a preview tick box. Before you commit the effect, click this on and off to see what it is doing to your picture.

I hope you like it. I do. It’s a simple way to make the mid-range tones and detail stand out.

Cheers.

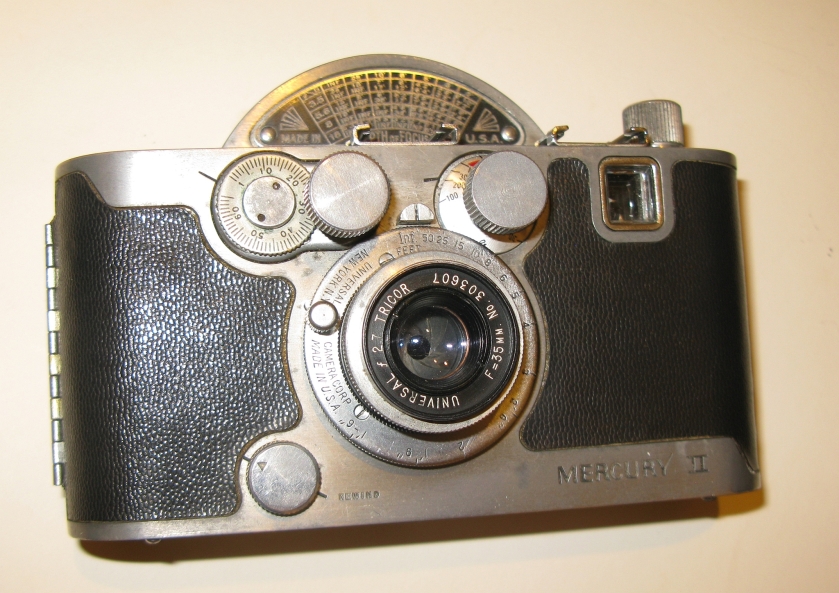
The Universal Mercury II

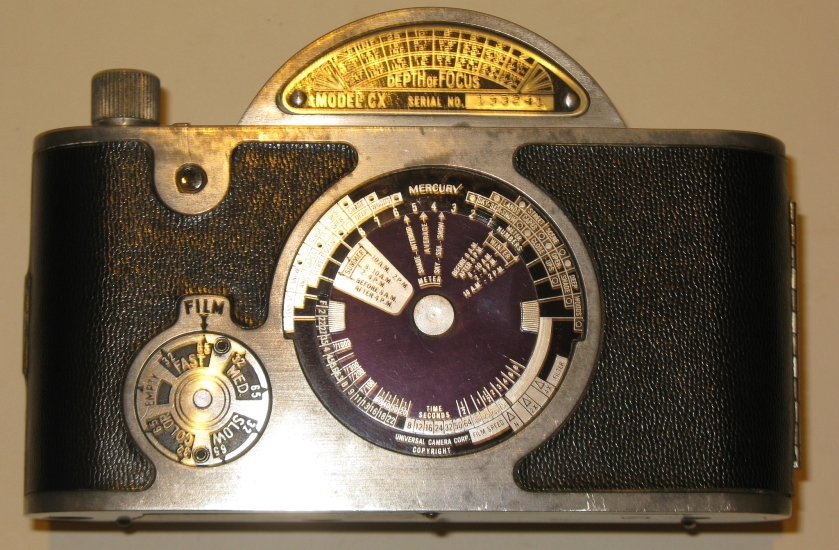
Now here’s an odd little camera. The Universal Camera Company originally made cameras that they sold on the same principle as razors: the money is in the refills, not the product. So they sold a well-featured camera with a high top shutter speed that used their proprietary film. And they sold them by the ton.

They switched to using the standard 35mm film cassette but didn’t want to redesign the unique rotary shutter. Since the standard 35mm frame was larger than their own film and the hole in the shutter was a bit too small, they repackaged the camera as a half-frame 35mm. They sold these from 1945 to around 1948 until the company staggered into bankruptcy and decline and faded away during the 1950s. They had patents on the shutter, so nobody else used it.

So the result is a nicely-made and highly-detailed little camera with a unique and fast shutter. Because of the way the shutter works it is supposed to hold its speeds well and not lag and drag like an old cloth focal plane job.

Mercury

The rotary shutter has an axis of rotation that is parallel to the lens. This puts the winding knob and shutter speed selector on the front of the camera rather than the top. The body has an arched top to accommodate the shutter disk, and Universal made use of it to mount the depth of field tables for the lens. The back of the camera is dominated by an exposure calculator, which works on the same principles as my (much simpler) plastic version but is obviously much more complicated and uses tiny and almost invisible numbers and text.

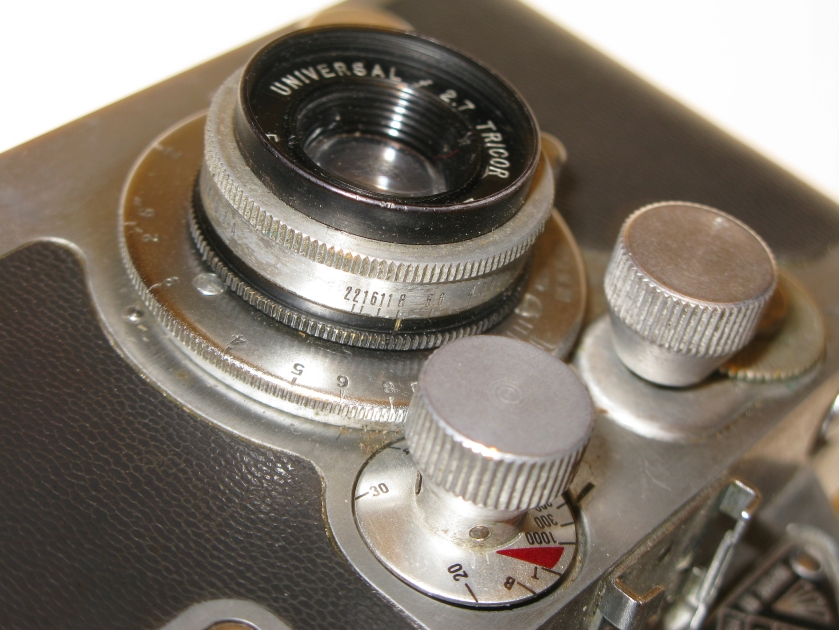
In fact, the camera is covered in tiny little engravings and markings. This is not a camera for someone with senior eyesight, not unless you carry a magnifying glass. The lens aperture scale for example, is well hidden by the shutter speed knob.

Apertures

Speaking of shutter speeds, they are an odd lot. The series of speeds is not evenly spaced at whole-stop intervals. Instead there are odd progressions of two thirds or sometimes one and a third stops. The full list of speeds is:

1/1000
1/300
1/200
1/100
1/60
1/40
1/30
1/20
B, T

One plus point though is that it has a true T setting: press once to open and again to close. No need for a locking cable release (even though there is a cable socket).

The lens is a teeny little American-made Wollensak. How teeny? It takes a 25mm lens cap. There were three lenses available – mine is a coated f2.7 triplet. There was a (probably cheaper) uncoated triplet at f3.5 and the top end job of a coated Hexar f2. All of them unscrew from the focusing helix, which is a fixed part of the camera.

The viewfinder is tiny and has no frame markings. The advice in the manual for dealing with parallax in close-ups is to use a pair of arrows in the right and bottom corners of the viewfinder. Place these on the centre of the subject if you are within five feet or less.

Viewfinder
See the two little arrowheads in the viewfinder? Line-up their intersection with the middle of the subject at close distances.

You will notice in the picture above that the camera has two flash shoes. The middle one is probably the earliest version of a hot shoe. The one over the viewfinder is a cold shoe and probably meant for a rangefinder.

The frame to frame spacing is wider than other half-frame cameras, so it doesn’t get quite as many shots per roll: 44 from a 24 exposure and 65 from a 36, rather than the 72 of something like an Olympus Pen.

Like a lot of old cameras, there is a definite sequence of actions to using it. The camera has to be wound on before the shutter speed is changed. The film counter has to be set before the camera back is closed on loading, so that it advances to the starting position. If you were looking for film photography to slow you down, this is the way to do it. It’s probably the photographic equivalent of a flintlock musket.

  1. Estimate range to subject, use a separate rangefinder or set the lens to its hyperfocal distance using the scale.
  2. Set aperture – you may need a magnifying glass.
  3. Check shutter speed is set. You need to wind-on first.
  4. Frame subject, adjusting if close.
  5. Press the slightly raised shutter button to hear a muted whoosh as the shutter spins.
  6. Wind-on using the knob on the front of the camera. The shutter speed dial resets to its set speed and the exposure counter increments by one.

You can slow down even more by using the exposure calculator on the back.

Dial

You will definitiely need the magnifying glass for this, plus good fingernails. There are two separate disks that rotate on a fixed background and it can be difficult to turn one of them without the other also rotating.

These aside, the camera is rather delightful. It looks fantastic and feels like a rock-solid little lump of cast alloy. Its quirks are endearing – this thing is 70 years old and still working!

Rock

So Fritz, how does she handle? Nicely. The camera has some good heft. The first film through it came back well exposed, so the seventy year old shutter works well. The frames are reasonably well spaced, even though the film must be advanced by a train of gears running from the winding knob. The lens seems sharp enough, although the limit is likely to be the small film frame. I like it – it’s quirky and interesting. I can enjoy using the camera as much as I enjoy taking pictures.

Negs
Not bad spacing and consistent exposure


Happy Christmas?

May the joys of the season be upon you.

Wishing for anything photographic? Doing anything photographic?

I’ll be shooting kids again to help Santa. Nothing to do with his list, more a memento merry. We run a Christmas fare, cafe and Santa’s Grotto each year to raise money for a charity. One year I did the shooting and printing on my own, and I now understand the phrase of being as busy as a one-armed paper-hanger. The heating in the hall is also stuck on full, so I looked like I’d been jogging in a sauna wearing two jumpers.

The best fun to be had is stripping it all down afterwards. Most of the snow effect is done using Arctic camo net we borrow from a local Army unit. Once this has been strung over a gazebo frame, fixed with zip ties and then bound with tinsel and fairy lights it doesn’t shift easily. Oh, plus the gaffer tape we use to stop the gazebo from collapsing on Santa.

Grotto
What kind of message are we sending here? And are those really spiders?

Good fun though, for a good cause. And amazing how many 6×4 prints you can get out in four hours.

In other news I got my Emulsive Secret Santa packed and sent in good time. Hope you like it, Ms O. On Christmas day itself we will be repeating the now traditional trip to the beach with the dog. It’s a fun thing, with most of the other dogs in Christmas jumpers and hats. Far better than vegging in front of the queen, unless she has something public and medieval planned for Andrew.

Anything relevant to a photography blog? Possibly my first colour development kit if I’ve been good. Otherwise, no. We don’t get scenic snow any more, or at least not until we try to go back to work. So no pictures of robins and snowflakes.

Our elections are being held today, so depending on the outcome I may just keep walking when I get to the beach. Think of it as Duxit. I’ve been looking at my local MP’s voting record on theyworkforyou.com. Quite depressing. I would normally avoid speaking to a politician when they come canvassing, but our MP has a lot to answer for. (Don’t worry, I’m of the John Stuart Mill persuasion). Our MP is also ranked 630 out of 650 in terms of hard work and representation nationally, and 53 out of the 54 in my region.

Grinder
So how does it feel when politicians make laws about your body?

On the plus side, I brew my own beer (from grain; what else would you expect of someone who develops their own film?). Lurking in the garage are the bottles of Chimay I made at the beginning of the year and left to mature. So I may just hide in the garage rather than walk into the sea. In that case I’ll call it Fuxit.

Anyway, enough of the sorrows! Happy Christmas.

Update

Looks like it’s Fuxit.

You’re right, that does look like a majority. Not sure we wanted to see that though.

But the good news is that if enough people listen to this song for the times, it could be number 1 for Christmas. All together now…

Back to the fumble

Have you ever been in the situation where you thought you were good at something, and then discovered that you knew nothing? You could say it’s like having your box prised open. It happened to me on my recent big diving holiday. I thought I had it down pretty good: I had a qualification and everything; I was even good enough to be in charge of other people underwater. Then we jumped into some warm water and casually went deeper than I had ever been before. I was a total rookie – I had strapped on just about all the kit I owned, treating a warm-water shore dive the same as a cold-water, far from shore, boat dive. I was a long way from streamlined, so had to put much more effort in to swimming. I was carrying too much weight, as I’d never dived without at least a very thick wetsuit. I was a bit anxious, so was breathing more than I would if I was relaxed. So I gulped through my air in no time. Far from being an experienced professional, I acted like a nervous beginner.

Have I done the same thing photographically? Oh yes! Many times I’ve thought I knew what I was doing, only to be proved wrong. I can develop film, until it comes out blank. I can do exposure, until I can’t. I can work this camera, and then it locks up. I can do flash portraits, until the pictures are totally underexposed. But these tend to be small and single events with an obvious solution. A quick self-applied slap on the head and we’re back in business. I’ve also been dumb on a motorbike – see photo for details. That was an externally applied slap on the head.

No, what I’m thinking about is the realisation that you are totally ignorant or borderline incompetent. People talk about imposter syndrome, but what if you realised that you really were an imposter? I know I have a lot to be humble about, but this is truly humbling.

It could be totally crushing: why not just give up and admit you can’t do it? If everyone else is so much better than you, why keep being the fool? Or you could treat it like the first stage in some imaginary ten-step programme. The first step is to admit to yourself that you are at the first step.

The second step might be to realise that you can learn. The good thing about acknowledging you are wrong is that you can become righter. There is a body of knowledge in lean manufacturing that says it’s better to do something the right way, even if you are bad at it, than it is to do the wrong thing efficiently. You do not want to become even better at doing the wrong thing. So you are better off learning from a position of incompetence than doing the wrong thing righter. Nobody is a total eejit – you will have done things and achieved things. It’s just that you have learned that you have more to learn. This should be a happy place – you can grow. Some lyrics and music just dropped into my head – anyone remember the Dylan song in Easy Rider? “He who not busy being born is busy dying” (“It’s alright, ma” for the curious. Brilliant lyrics but a protracted dirge of a song.). So come on, be more Bob (learning, not droning).

Admitting that you need to learn is a huge release. If you can let go of that defensive pride, you are ready to learn what you don’t know or can’t do. And if you add what you learn to what you already know, you can get better at what you do. Sounds a bit New Age inspirational, doesn’t it? This isn’t supposed to be a pep-talk or the start of a new philosophy. I just know that, for me, trying to defend what I know when it is obvious that I don’t know enough is pointless. The world can’t hear my excuse: events will find-out the truth. And as an ex-boss used to say “if you think you’re good, you are not comparing yourself with the right people” (thanks for your support, John!).

So in diving terms I removed the excess weights, stripped the kit I didn’t need, focused on my breathing and used a larger tank. Photographically – I have re-read the manual and practised using certain set-ups or combinations of kit. I have owned my digital SLR for more than ten years, and I still read the manual for a couple of the features that I know it has but I rarely use. I have bought a new (to me) underwater camera, so I’m taking lots of pictures of small objects using flash until I learn how to use it. These aren’t really the same as discovering you are ignorant though – they are ways of avoiding the collision with ignorance. The real pain comes from the realisation that you don’t know enough. Humility hurts. It’s that feeling of pride leaving the body.

What we need around us is people who understand that knowledge and ability are but sparks in the void, and there is more that nobody knows than we do. Recognising that someone has admitted to themselves that they don’t know or can’t do a thing is supportive. There’s no need to be an arse about someone knowing less than you: just be aware that your time will come. So perhaps the golden rule of learning is to help someone as you would like to be helped yourself? And be more Bob.

Design a site like this with WordPress.com
Get started